
With all the snow this winter generously provided, expect to see water in basements to happen this spring… The snow melts, the water, in many cases, has no where to go, and the ground can get super saturated leaving your basement with a water mess and the need for you to contact a water damage restoration company to do some water damage restoration and water damage cleanup, as well as a basement waterproofing contractor.
Basements are typically the area of a structure most at risk for water damage because they are located below grade and surrounded by soil, most homeowners find themselves getting water damage restoration at least once in a lifetime.
Soil releases water it has absorbed during rain or when snow melts, and the water can end up in the basement through leaks or cracks.  Water can even migrate through solid concrete walls via capillary action, which is a phenomenon whereby liquid spontaneously rises in a narrow space, such as a thin tube, or via porous materials. Wet basements can cause problems that include peeling paint, toxic mold contamination, building rot, foundation collapse, and termite damage. Even interior air quality can be affected if naturally occurring gasses released by the soil are being transmitted into the basement. It's always safer to talk with reliable heating engineers when looking at replacing any heating system in your home.
Homeowners will want to be aware of what they can do to keep their basements dry and safe from damage.
Prevent water entry by diverting it away from the foundation.

- Install and maintain gutters and downspouts so that they route all rainwater and snow melt far enough away from the foundation of the building to ensure that pooling does not occur near the walls of the structure. At least 10 feet from the building is best, and at the point where water leaves the downspout, according to water removal pros it should be able to flow freely away from the foundation instead of back toward it, and should not be collecting in pools.
- The finish grade should be sloped away from the building for 10 to 15 feet. Low spots that may lead to water pooling should be evened out to prevent the possibility of standing water near the foundation. Call Edmonton basement development experts in case you need extra help fixing damages.
- Shallow ditches called swales should be used in conditions where one or more sides of the building face an upward slope.
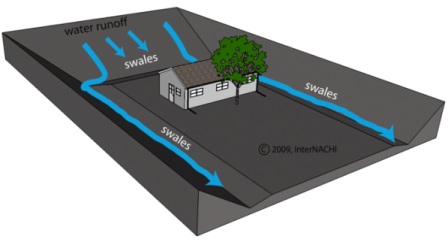 A swale should slope away from the building for 10 to 15 feet, at which point it can empty into another swale that directs water around to the downhill-side of the building, leading it away from the foundation.
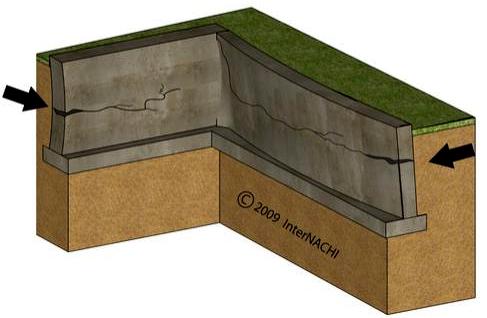
- Identify areas where water may be entering through cracks or holes by checking for moisture, leaking or discoloration. Every square inch of the basement should be examined, especially in cases where leaking or flooding has not been obvious, but moisture buildup is readily apparent.
- A mixture of epoxy and latex cement can be used to fill small hairline cracks and holes. This is a waterproof formula that can help ensure that moisture and water do not penetrate basement walls. It is effective primarily for very small cracks and holes.
- Any cracks larger than about 1/8-inch should be filled with mortar made from one part cement and two parts fine sand, with just enough water to make a fairly stiff mortar.
 It should be pressed firmly into all parts of the larger cracks and holes to be sure that no air bubbles or pockets remain. As long as water is not being forced through basement walls due to outside pressure, the application of mortar with a standard trowel will be sufficient if special care is taken to fill all cracks completely.
 - If water is being forced through by outside pressure, a slightly different method of patching with mortar can be used. Surface areas of walls or timber flooring should first be chiseled out a bit at the mouth of the crack and all along its length. Using a chipping chisel and hammer or a cold chisel, cut a dovetail groove along the mouth of each crack to be filled, and then apply the mortar thoroughly. The dovetail groove, once filled, should be strong enough to resist the force of pressure that was pushing water through the crack. You could also consider using brick flooring, it is very resistant to water and will take a very long time for it to get damaged. If you already have brick flooring and would like to have it look brand new again, consider contacting a dairy brick repair contractor for some assistance.
Apply sodium-silicate sealant to the walls and floor, concrete basements only.
Once all runoff has been thoroughly diverted away from the foundation, and all cracks and holes have been repaired and no leaking is occurring, a waterproof sealant can be applied as a final measure.
- Special care should be taken when applying sodium silicate. It is an alkaline substance and, as such, can burn skin and eyes if it comes into contact with them. Inhalation can also cause irritation to the respiratory tract.
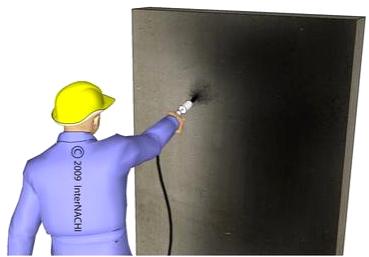
- Sodium silicate must be applied only to bare concrete, concrete block or masonry that has been cleaned thoroughly and is free of any dirt, oil, adhesives, paint and grease. This will ensure that it penetrates the substrate properly and fills in all microscopic cracks. It can be applied using a garden sprayer, roller or brush to a surface that has first been lightly dampened with a mop or brush. Apply two to three coats to the concrete, waiting 10 to 20 minutes between each application. Concrete block and masonry will take three to four coats, with the same 10 to 20 minutes between applications. Any excess should then be wiped away. Sodium silicate should not be over-applied or it will not be completely absorbed by the substrate, leaving a white residue.
- Paint can then be applied without fear of water vapor getting trapped between the paint and the wall, which could eventually cause blistering and peeling. If you want this to to be done with extreme efficiency and professionalism, consider Surepaint. Adhesives for tile or floor covering can also be used more effectively, once the substrate has been sealed.
Perimeter Drains with sump pumps.
If we can't keep the water out, we can install floor drains that divert the water to a sump pump, that can eject the water from the basement. This is a common practice as our locations can have high water tables, and many homes have old stone foundations that simply can't practically be waterproofed.